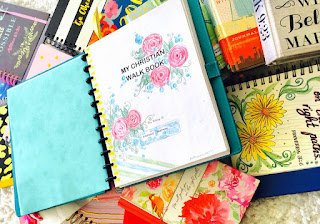
" Th steps of a (good and righteous) man are directed and established by the Lord, And He delights in his way (and blesses his path). When he falls, he will not be hurled down, Because the Lord is the One who holds his hand and sustains him. - Psalm 37: 23-24 (AMP) Document your faith walk using MY CHRISTIAN WALK BOOK. Customize your very own WALK BOOK by using the pages #GODEMPOWERSME created for you.
Friday, April 7, 2017
Tuesday, March 28, 2017
HOW TO SET-UP YOUR OWN CHRISTIAN WALK BOOK USING TUL SYSTEM / RING BINDER
There are two options you could use to house the pages for
your walk book.
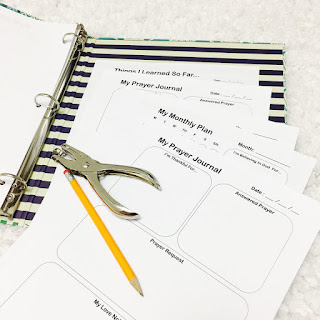
1. RING BINDER
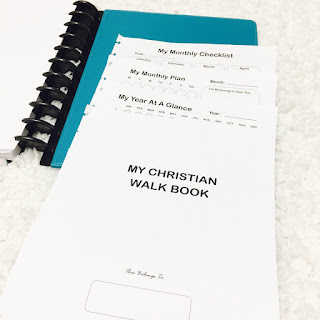
2. DISC BOUND SYSTEM
1. RING BINDER

2. DISC BOUND SYSTEM

Today, I will show you step by step on how to do it:
STEP ONE : Print out the PDF File you downloaded from Etsy . For a
better quality, make sure that your printer settings is on best
quality selection. Any paper of your
preference will do. However, I recommend that you use a thicker kind of paper
for the ‘My Faith Expressions” page especially if you will be using mixed
media. You can also do back to back
printing but this takes a little bit of patience to do and you would
be needing a quality paper too, in my opinion. I have to tell you that I went the easy route , used what I already have and did
the one- side printing.
I would normally just print out one set initially and print
out additional pages after I set everything up.
STEP TWO: Decide on
what system you want to use and get your materials ready.
You can either use the Disc Bound System or The Ring Binder.
Ring Binder
For this you will need :
Ring Binder - I got this 3-ring Binder with a nice pretty design from Walmart for less than $4.00 It’s cute and it will work just as good.
2 Puncher - Use the single puncher if you don’t have the 3-hole puncher like I did.
Pencil for marking
Disc Bound System
I personally use the TUL system which I got from Office Depot.
But you can use other brands as well ie. Arc by Staples, Create365 or the IQ360 carried by Walmart. The
cheapest route would be IQ360.
For this system, you will need the following :
1)
Discs - I first used the one inch ones but I
consistently do my devotionals so I used the 2 inches discs. A pack of 12 pieces costs
$4.50. For the letter size, you would need 11 discs.
2)
Cover Sheet-
You have several options for this.
a DIY Covers ( Front And Back)
·
Pretty Folder - You
can buy any folder you may like, cut in half and into letter size. You can add an extra space ( around half an
inch) since this would be your cover.
·
A laminated letter size sheets like this one.
·
Any thicker kind of paper. (Add half an inch as well : 11.5 x 9 )
·
Plastic Cover – A repurposed plastic folder will
do.
b A Ready-Made Cover - I figured that since I will be using this
system for a really long time, I invested on a
sturdy cover. I bought the TUL leather cover notebook, disassembled it, removed the
pages it came with and replaced the discs.
3)
Puncher
Disc Puncher
- This one I bought for almost $35. It’s easy and convenient to use.
b Single Puncher
- You can use this r too if you are on a budget but still wants to use the
disc system. Punch holes on where the
discs would go and cut slits on each hole.
I have to warn you though, using a single punch is a tedious (and I
should say, a messy) process. I gave up on it and just got me the TUL disc punch
for the convenience.
Note:
When I first used the single puncher, I bought the plastic dividers for
the TUL system and used it as a guide to know where to punch holes. This way, I
didn’t have to estimate on where the discs would go and everything will be in
perfect alignment.
STEP 3: Start Punching.
Here's the step by step process on how to punch holes using a single puncher:
Align the paper with the Ring Binder and using your pencil, mark the places where you will punch holes at.
You can use the first page or another paper as a template for punching the rest of the pages.
Repeat above for the rest of the pages.
STEP 4: Arrange
all the pages however you please and depending how you will use it.
STEP 5 : Assemble it.
For the RING BINDER, insert the pages on the ring binder and
you are all set!
Here is how you assemble the DISC BOUND SYSTEM:
Lay the front and back covers side by side and get your discs.
Begin to insert the discs one by one from top to bottom:
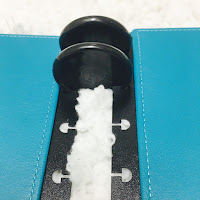
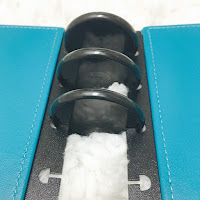
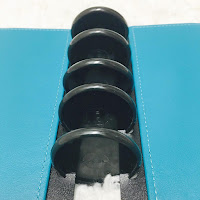
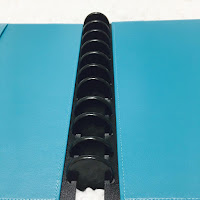
Now insert your pages , a few pages at a time.
Add pages as you please and now you are
set!
I hope you find this tutorial helpful.
Please visit my Etsy shop for the pages you
want to incorporate on your very own (My) Christian Walk Book: www.mychristianwalkbook.etsy.com
.
Thank You!
Labels:
#availableonetsy,
#book #agenda,
#christian,
#christianfaith,
#christianplanner,
#devotional,
#faith,
#faithjournal,
#faithplanner,
#journal,
#mychristianwalk,
#planner,
#plannersetup,
#tul
Thursday, March 23, 2017
Available Sets On ETSY : My Christian Walk Book
Start documenting your faith with your very own "MY CHRISTIAN WALK BOOK". Choose any or combine the following sets to customize your very own faith planner / walk book.
These are now available for digital download on ETSY.
https://etsy.com/shop/mychristianwalkbook


Wednesday, March 22, 2017
Monday, March 20, 2017
MY CHRISTIAN WALK BOOK: DESCRIPTIONS AND SECTIONS PER PAGE
Below are the descriptions of each page created for MCWB or
My Christian Walk Book :
TITLE PAGE:
·
My Christian Walk Book
The first page which contains the
title that says : My Christian Walk Book with a space provided to write on your
name.
PLAN YOUR WALK (CALENDAR) SET:
·
My Year At A Glance
The months and dates in a year on
one page, it has hearts you could color in
or put stickers on for important
dates. A visual take for your year.
·
My Monthly Checklist
This page is a more detailed year
at a glance, where you can write on the specific details for each date you had marked on the previous
page. This is a place where you could write on birthdays, anniversaries and
special occasions.
·
My Monthly Plan
You can use this to plan your
month. This is where I would write on important dates and events I need to
remember. This has also notes section for Important tasks , a bible verse that
speaks to you for the month, the possibilities are endless on a blank space,
really.
·
This Month’s Milestones
It’s time to look back at the
month that has been. This is normally a page in progress for me, I would write
on goals that had been achieved, special accomplishments and faith victories on
this page.
·
My Week At A Glance
This page is used to plan your week
from Monday to Sunday, all undated. Use when you please. This has a whole space
of Notes Section as well. I normally allot the space for tasks or it could be a
space for goal-setting if you need to work on your goals and break it down
throughout the week.
·
My Day At A Glance
This page has a few
sections:
1.
Happening Today – this space is for the
activities and events of the day
2.
Remember To – a section where you can write
important tasks for the day
3.
Blessings of The Day – write your blessings on
here, small or big ones
4.
My Quiet Time – what did you do with your quiet time with God?
This is the space where I would write down which one I did from the
Devotional Sets.
5.
A fun section to assess how your day has been,
fill in the blanks for :
a.
Good Deed of the Day – Did you help, serve and
bless someone?
b.
Virtue of The Day – What Christian virtue stood out
in you?
c.
Word of the Day – Was there a word that spoke to
you today, something that motivated you?
d.
I Feel- How was your day, how did it make you
feel?
e.
I Want- Was there anything you liked or wanted
that you’d like to have someday?
f.
I Let Go Of – Did you let go of anger today? Or
Anything you don’t need in your life?
g.
Vision Update- Did something happen today that
could count as an update or progress for your goals for the week, for the month
or your vision board?
h.
What Made Me Smile Today- A hug, a purchase, a wink , write whatever
made your heart leap
i.
What Needs To Change – Is there any bad habit
you want to get rid of , an att
VISUALIZE YOUR WALK (GOAL SETTING AND VISION
BOARD )SET :
·
One Year From Now
Cut out pictures and make a collage
of how you see yourself or what you want to accomplish and have or what you would be like in one year. Write a note to yourself and check back after
a year on how you fared.
·
Down The Road
Cut out pictures and make a college
for your long term goals and visions and what you are believing in God to have
or accomplish. Write a note to your self.
This is a good place to get motivated each day.
·
My Goals At A Glance
This would be your monthly goal
setting sheet. What are your goals for your finances, family/ marriage, travel,
ministry, body/ health and all the other aspects in your life that you would
like to achieve in a month? I recommend you use the monthly plan to lay out
your plan on how to accomplish your goals. It is also good to incorporate your
vision for yourself for the year. Remember, each step you take is a like a part
of a big puzzle.
·
Vision Board
This page would be your detailed
goals, dreams and vision that you would like to see come to reality. Cut some
pictures and make a collage out of it. Be specific in describing your goals.
Make one or two for each category in
your life. You can do this yearly or monthly.
WALKING THE WALK (DEVOTIONAL) SET :
·
My Prayer Journal
I never miss writing on my prayer
journal. There’s always something I need to pray about.
This journal is divided in four
sections:
1.
I’m Thankful For – What are you grateful for
today? Or this week (if you do this weekly)?
Check “My Day At A Glance” and see if there’s a particular blessing that
stood out. Write about it.
2.
Answered Prayer- God makes miracles each day.
Was there something that you had been praying for that got answered today/ this
week? Write about it.
3.
Prayer Request – Make your hopes, wants and
needs known to the Lord, in bullet points or sentences.
4.
My Love Note To God- Praise and thank God in this section. Tell Him how much you love Him, write what
your heart tells you to write because prayer is not just asking God for stuff.
·
My Bible Study Journal
There are many ways on how you can
study the Word Of God. This particular style has the following sections:
1.
Bible Verse-
Write down the scripture/ verse you would like to study . I would say
the verse out loud while you write it.
2.
Studying The Word- Write down each word in the scripture. Write
down what you think it means or how it relates to you. I would usually look up
definitions from the dictionary. You would be surprised on what you find out.
3.
Daily Walk Application – Ask yourself, how would
this verse apply to your life as a
Christian? Are there steps that you need to take?
4.
Prayer – When you pray, apply the verse and
speak God’s words in your life.
5.
Notes -
Write down notes for future study and things to do from the verse you
just studied
·
My Daily Walk Journal
I use this when I want to listen to
God. I would go to a quiet place, with a question , goal or prayer in my heart I would close my
eyes and I would let my thoughts flow. I would write about everything that
would come to mind about the subject. You would be surprised what God would
tell you. Remember Intuition and flowing thoughts are God speaking to you.
·
Memory Keeping Journal
Keep mementos of your day on this
page. You can make it pretty or just paste scraps of things to remember your
day by.
·
My Night Visions
Log your dreams on this page and
fill out the following sections:
1.
Dream Points – Jot down what your remember about
your dream in bullet points
2.
Biblical Interpretation – I would go on line and
search for bibilical interpretation. Be careful now, secular interpretations of
dreams is totally different from biblical interpretation.
3.
Reflection- A space where in you would write
about what you think your dream means on the biblical interpretations you
researched and how it relates or applies in your life.
4.
Prayer- Relay your dream to God to give you
wisdom about what your dream meant and how it will affect you on your faith
walk.
5.
Future Notes- Dreams do come true especially
when it comes from God. When one day, you would look at your past dreams , you
can write down your notes if the dream came to pass or not or whatever you feel
like writing on here.
·
My Faith Expressions
This space is allotted for the
creative at heart, this is the space where you can do your scripture
illustrations , doodling etc.
NOTE-TAKING SET:
There are so many ways to take down notes and
these are some I recommend you get:
·
My Favorite Bible Scriptures
Fill in the boxes with your
favorite bible scriptures or verses for future bible study.
·
Things I learned So Far ( Lesson Notes)
Write down sermon or preaching
notes, notes from your training sessions
you are taking notes from conferences,
notes from books you are reading or notes any
teaching you learned. It is also
a good place to transfer notes from your scratch papers and get to review them
too.
·
Jottings Along The Way ( Motivational Notes)
This is a page you go back to
empower yourself, those one liners and phrases that made an impact on you
. Your notes for self-motivation.
·
Checklist (To-Do Lists)
We love lists. If you just don’t
know where to put it yet on your planner, dump it all here.
·
Notes
Just the classic notes section.
TRACKING YOUR WALK (RECORD-KEEPING) SET :
This
set is mainly for record- keeping of habits, interests and activities and so
much more.
·
My Christian Weekly Tracker
Want to know how you fared? Keep a record if
you’ve been good or bad. Assess , improve and repeat. Color In the hearts if
you did good for the day. Track your quiet time, habits, behavior and attitude
you want to continue or wean from.
·
Leading Others To Christ
Remember the great commission. Keep
track of people you want to get to know Christ. List down names are ministering to and praying for in this
section.
For additional resources, I
made pages for the following:
·
Christian TV Shows Log
·
Christian Books Log
·
Christian Audio CDs Log
·
Christian Music Log
·
Other Journals Log – Just in case you can’t help it and you have
other journals and you want to keep a record of them.
·
Church Services And Activities Log
·
Tithe Log
·
Offering Log
Subscribe to:
Comments (Atom)


